List of Monumental sculpture projects 2015

  • 1 http://swannbb.blogspot.fr/2015/02/sunday-robot-play.html
  • 2 http://shuengitswannjie.blogspot.fr/2015/02/interactive-reading-room-tea-house-2015.html
  • 3 http://swannbb.blogspot.fr/2014/06/neo-ming-bed-luxembourg.html
  • 4 http://swannbb.blogspot.fr/2013/02/yuzi-paradise-tell-moon.html
  • 5 http://swannbb.blogspot.com/2011/09/12th-changchun-international-sculpture.html
  • 6 http://www.saatchionline.com/Shuen-git

Friday, 14 April 2017

printing the world// imprimer le monde exhibition+conference // 3d printing

https://www.instructables.com/id/How-to-Apply-3D-Printing-to-Create-Bronze-Sculptur/
How to Apply 3D Printing to Create Bronze Sculpture

Step 1: Digital Modeling

Digital Modeling

Step 2: 3D Printing

3D Printing
After the digital model is created, we will print it out. 

Step 3: Silicon Rubber Molding

Silicon Rubber Molding
Since this sculpture is to be made with the lost wax casting technique, our next step is making a silicon rubber mold and wax work from the printed model.

Step 4: Bronze Casting Sculpture

Bronze Casting Sculpture
Our next step is using the rubber and wax model for bronze casting.
Our craftsman will carefully cast bronze, do chasing and polishing on the bronze casting sculpture.

http://www.iaacblog.com/life/iaac-takes-part-to-imprimer-le-monde-at-the-centre-pompidou/

printing the world
http://www.iaacblog.com/life/iaac-takes-part-to-imprimer-le-monde-at-the-centre-pompidou/

What is a Fab Lab ?

The fab lab (short for “fabrication laboratory”) was developed at MIT in the early 2000s. It is a small-scale workshop offering public access to computer-assisted design and production tools, enabling such operations as milling, laser cutting and 3D printing. The emergence of fab labs is associated with the “maker” movement, a digital extension of the radical DIY culture that emerged in the 1960s, which combines practical, even craft skills with the use of digital tools. Through the fab labs, 3D printing has become the emblem of the new sharing economy.
in Code Couleur, n°27, january-april 2017, pp.22-25

===

Thursday, 13 April 2017

Growing coconut palm from a seed 2017

Experimental Garden 2017, Coconut palm from store bought coconut
purchased two coconuts from Bilal, vaureal.  1.5eur for 2
I shooked the two coconuts and make sure they were heavy , with water inside.
all eyes are fine, no visible  mold etc.

https://youtu.be/r07WvwiiFRI
Growing coconut palm from a seed

takes 2wks to 1 month from coconut,
1// soak 3 nights in warm water
2// put in zip locked bag; put some water inside bag; keep moist
3// eyes facing up so sprout will grow out of one of the eye

Tuesday, 11 April 2017

bronze pla; PRINTING WITH WOOD AND METAL ON AN ULTIMAKER 2; printing w beeswax


printing w beeswax
http://www.rooiejoris.nl/3d-printed-beeswax/

https://protype3d.fr/blog
bronze pla

http://widerwille.com/tyl010
diff wood, diff settings, testing metal pla

PRINTING WITH WOOD AND METAL ON AN ULTIMAKER 2


BRONZEFILL

This material is based on our unique PLA/PHA recipe which means that it will print very similar to our other PLA/PHA materials. We’re sure most will be able to dial in settings in no time, but we still thought a write-up on print settings is interesting to share. If you have great tips or slicer settings please share!  support@colorfabb.com

BUILD PLATFORM

This filament will print great on both heated and non heated build platforms. For cold build platforms we generaly use blue painters tape which you can buy at any decent hardware store. We’ve noticed that bronzeFill has prety much no warping what so ever, it’s much better then regular PLA.
For heated build platforms we use a temperature of 55-60 C which will keep the print sticking to the platform. It can be printed straight on glass or with a bit of gluestick applied to it. We’ve also printed it succesfully on kapton tape with the same temperature settings.

SLICER SETTINGS


The next few tables show the most relevant slicer settings for Cura en Makerware. If you prefer to use a different slicer software you should be able to find similar settings and create your own profiles.
3D PRINTERLAYERHEIGHT (MM)SPEED (MM/S)TEMPERATURE (C)BUILD PLATE TEMP (C)RETRACTION DISTANCE (MM)RETRACTION SPEED (MM/S)
Ultimaker Original0.250mm/s215n.a.4.545
Ultimaker 20.250mm/s22055 / 604.525
Makerbot Replicator 20.270mm/s200Cn.a.(standard makerware)(standard makerware)
Profiles
ultimaker_original_02_bronzefill
The infamous torture test by Make, printed on the Ultimaker Original.
The infamous torture test by Make, printed on the Ultimaker Original. Slight stringing which might be solved with a adjusted retraction settings.
An excellent result of the Torture printed on the Makerbot Replicator 2.
An excellent result of the Torture test printed on the Makerbot Replicator 2.

POST PROCESSING

Normally we don’t like to do post processing of any of our prints, they should look awesome straight of the printer. For bronzeFill we’re happy to make an exception, since it will elevate your models to another level when polished. Here we’ll document the various methods of post processing the 3d prints. We’re a little out of our depths here so we’ve been seeking help from the active community of makers.
Various grit sand paper.
1. Sanding
First what you want to do is sand your model with a fairly rough grit of sand paper, something like 220-240 should work nicely. BronzeFill is much easier to sand down then regular PLA, so depending on your model this shouldn’t take too long. By increasing the grit of the sand paper the model will get smoother everytime, exposing the bronze particles at the surface, but it will still look matte and dull.
We used steel wool after sanding down the layers.
2. Steel wool
This tip came in from Paul Braddock, a talented character modelling artist and active member of the Ultimaker community. He used steel wool to polish the surface which will start exposing the bronze particles even more. We’ve tried this method with a fairly fine grade of steel wool and were impressed how shiny it already got!
Making it all shiny and nice!
3. Making it Shiny!
Now that the layers are sand down and the bronze particles are already shining a bit on top of the surface it’s ready for the next step. Now this is were it becomes really interesting, since there are so many methods of making bronze shiny. We used a copper polish which gave nice results. It was applied with a dry towel making small circular movements and applying light pressure, then we used another side of the towel to get rit of all the polishing paste.
A print by Paul Braddock "treated with an antique patina, the bronze fill reacts to it just like foundry cast bronze."
A print by Paul Braddock “treated with an antique patina, the bronze fill reacts to it just like foundry cast bronze.”
Apart from polishing the material to make it more shiny one can also apply products to create a patina look. We haven’t been able to try this personally but Paul Braddock did. This is what he was able to create with an antigue Patina, it looks stunning.

Monday, 3 April 2017

transparent 3d prints, industrial strength of most filament chart

http://taulman3d.com/t-glase-features.html

use .7mm nozzle, .82, to 1mm, thick layers will produce a more transparent print

http://taulman3d.com/how-to-choose.html


How do you choose the best material for your application.
      The table above, is the average of our measurements of actual 3D Printed test parts for the noted polymers.  As any extreme of a polymer get's close to the orange center-line, we must pay special attention and or be more specific as to the desired intent of the end part.  As a point of reference, a rubber-band would be on the left and have little Tensile, but a considerable elongation/stretch/bend.  On the other end, we would have window glass.  While window glass has a tensile of ~9,000PSI, it has zero elongation, i.e. it will crack easily.  ABS is often used as it has a general combination of reasonable tensile, but with enough elongation so as not to disintegrate when put in a mild strain.   Another common 3D Printing material is standard PLA.  As noted above, we are giving up elongation for tensile.  The end PLA part "feels" hard, but it's also very brittle. 
     
From the list of materials we can denote some potential uses.

PCTPE = PCTPE is a flexible nylon developed by taulman3D specifically for 3D Printing.  It has an additive of TPE elastomer to give it additional flexibility.
Potential uses:
Large inaccessible gears.
Wearable items
Cogging systems and ratchet systems
Vibration damping
Motor mounting

Nylon 230 = Nylon 230 
is a low temperature nylon developed by taulman3D specifically for 3D Printing on systems that have cold print beds and lower temp capabilities.
Potential uses:
Gears - light load
Fan blades
Housings
Phone covers
Protective covers/enclosures.
Cosmetics containers


Nylon 645 = Nylon 645 is an Industrial nylon developed by taulman3D specifically for 3D Printing with non-destructive evaluation capability.
Potential uses:
Gears - Med/Heavy load
Propeller blades
General Industrial needs
Large Flanges, Housings,  positioning
Wide Chemical resistance of petrol's
Sand blasting
Masking
Spacers/Interconnect

Nylon 645 REV"B" called Bridge Nylon = Bridge was developed as a request from the 3D Printing community at large.  Potential uses:
Gears  - Med Load
Supports for spacers, flanges and general utility
Med chemical resistance, uses exclude any chlorine's
Household replacement parts.

Nylon 680 = Nylon 680 was developed at taulman3D to meet certain FDA criteria for clinical and other applications.
Potential uses:
There are many uses in the clinical, food and medical industries.  As any material needs to be fully tested for each use, it will be several months before testing is complete and certified uses are noted.

Alloy 910 = Alloy 910 is a significant development by taulman3D and both our chemical house and post processing company.  The goal was to provide a super material with very high tensile, yet sufficient elongation to maintain a high degree of durability.  Alloy 910, when 3D Printed comes in at 8,100 PSI Tensile and close to 12,000PSI when injection molded.
Potential uses:
Any industrial parts that are currently being made of other high tensile polymers.
Large motor mounting
Industrial vibration isolators and damping parts
High Pressure Sand Blasting resistant
Sand Blast Masking
Electroplating supports and hangers
Chemical dip and tank supports.
High end gears and cams
Chemical resistant equipment covers.

   Next in-line are the Co-Polyesters, guidel!ne, t-glase and TECH-G 
 A major advantage to all co-polyesters is their low shrinkage specifications.  t-glase, n-vent and Tritan are some of the easiest-to-print polymers as they adhere well to either clean glass heated to 5C below their Tg or glass with a coat of PVA heated to just 45C.


guidel!ne = guidel!ne is a unique high strength PETG based material with excellent high temperature printing capabilities.   Users know that printing small features of some parts can be difficult due to thermal build-up.  guidel!ne is much less susceptible to these thermal issues allowing for finer detail without distortion.  guidel!ne is also released as a starting point for individuals and companies wishing to obtain eventual FDA/CE certification for a device knowing that the raw material itself is listed with the FDA and has already passed specific FDA testing.
Potential uses:
As a replacement for any parts currently printed using ABS, PLA or PETG
   guidel!ne is 100% bonding layer to layer and parts will never "split" apart or "de-laminate" even in very large prints.
Glass like qualities
  Glass clear when used with clear epoxies.
"Non-shattering" parts upon over-stress
Architectural Components.
Jewelry

t-glase (Tee-Glass) = t-glase was developed specifically by taulman3D to provide three major features to 3D Printing.  Low shrinkage, Higher strength than ABS and aesthetics beyond ABS and PLA due to it's enhanced optical properties.
Potential uses:
As a replacement for any parts currently printed using ABS
   t-glase is 100% bonding layer to layer and parts will never "split" apart or "de-laminate" even in very large prints.
Glass like qualities
  Light Pipe capable
  Glass clear when used with clear epoxies.
  Crystal like reflections of the surface.
  Red, Green, Blue and Black are translucent.
  Now in Opaque White for a white that has a super gloss surface.
"Non-shattering" parts upon over-stress

Architectural Components.
Jewelry
Gaming pc's
Light catching designs of any type.

TECH-G = TECH-G is the highest strength PETG for standard PETG polymers.  TECH-G was developed for large prints that require
low shrinkage over a wide surface area.   TECH-G is available in 1kg, 3.5kg and larger spool sizes for large area printers.
TECH-G's main use is for large components and Architectural  landscapes.


BluPrint - BluPrint is a specialty polymer developed to specifically handle High Heat Deflection requirements.  With a Tg of 110C and a print temp of only 265C, BluPrint is an easy to print polymer that comes as a clear material similar to t-glase.
Potential uses:
Lamp covers
Antique car/item lenses or ligh covers, i.e. tail light, turn sig, etc..
Any use in high heat environment
Thermal spacers
Thermal Clamps
Any part that will need to be placed in boiling water for preparation.
    BluPrint can sustain boiling water for 5 continuous hours.  Clarity will be lost after 2 hours to a dull haze.  Structure will be maintained.


Next are the more Flexible materials T-Lyne, SemiFlex 

T-Lyne - T-lyne is a unique, crystal clear polyethylene co-polymer isomer developed specifically for high durability, flexibility, unique viscosity and a wide temperature range.   Glass-like aesthetics can easily be obtained at high layer sizes using low speed and low temperatures in the range of 190 C to 210 C.  Utility style parts are easily printed faster at standard layer sizes using higher temperatures up to 245 C, depending on nozzle size.
Potential uses:
Prosthetic
Clear bottles, lids and containers
Post print mold-able features
Extreme Impact resistant parts
Living Hinge parts
Stretchable parts

NinjaFlex 3D Filament, SemiFlex - SemiFlex material boasts flexibility, strength and reliability for your 3D printing projects and is slightly more rigid than NinjaFlex to expand your printing possibilities.
SemiFlex is best for the following types of projects:
High level of detail
Contain intricate parts
High resolution text
Unsupported vertical printing
Shock-absorption needed
Requires less flexibility than NinjaFlex original 3D Filament


Additional notes:
1. Only Nylons should be used for gears, etc where a slippery surface is desired.  All other materials will scratch against each other creating a plastic dust.  And eventual failure.
2. The scale above is for 100% infill of parts.   Reducing infill % and number of perimeters will have a tendency to reduce Tensile, yet increase elongation.
3. Nylons do not crack/shatter, but will eventually compress and fold during severe over-stress.  t-glase and TECH-G will not shatter, but can break along and against layers.  Alloy 910 can either fold/compress or crack depending on part design.  An excellent feature of Alloy is that Support material easily breaks away, yet durability is retained!
4. Nylons can be threaded using std TAPs and drilled directly without creating cracks.  t-glase and TECH-G can also be tapped.  When drilling, use a pilot hole close to the desired DIM.  
5. Only use Nylon 645/Bridge or Alloy 910 for Sandblasting masking or similar applications.  Most other materials will be destroyed in seconds.
6. For parts to be used outdoors, use a UV coating.
7. For High temperature Nylon, use Alloy 910 or Nylon 680.  For High temperature co-polyester, use BluPrint.  


Friday, 31 March 2017

Japan Party Nanterre - "BodyCapture" figurines with Luc Benhaim

http://www.japan-party.net/categorie/informations-pratiques
www.fuboss.es

BodyCapture
 Luc Benhaim; www.sculpteo.com/gallery/printle shop
1-2 April 2017

A friend told me about his cosplay weekend, he said, he will have himself scanned and a doll made of himself.  If we want the .stl file will be available for 8$us.  Sounds very interesting to me!  I immediately thought... How about a scan of my xyz Guqin? 

So I got to the cosplay event - Japan Party - at Nanterre.  Went through a beautiful park, urban park, and full of cosplay people!  Mostly young 20 something with pink long hair, purple braids, animal shapes, warriors, star war soldiers with sound effects and fairies w wings.  All sorts.

So I got inside, and saw parents with children everybody all dressed up in medieval clothing.  And lots of gothique bloody makeup.  It was a fun day with all kinds of pop manga style get ups.

I found the BodyCapture stand and was amazed by the quality of the speedy scan!  Statuette making of the self has come a long way.  I had seen at Linz, a face mapping robot.  At autodesk trade show, a large cubicle for body scanning and tried it too.  But this one, ran by Luc Benhaim was a simple stand with one lazy susan turning platform for the body to stand on and it rotates around.  Then, the scanner is a small unit that sits on a column and travels up and down, scanning from top to bottom, while the turning platform rotates 360 degrees.  I first tried the body scanning dressed up as my usual self.  It was very very good, so sharp and gd colors gd details.  Then I had my xyz Qin scanned.  I had brought a huge clamp and had succeeded in having the qin stand vertically.  Mr. Losit did a photogrammatry overall portrait of the qin.  I had it done with the tail up, then, the head up.  The two images will be stitched together using a software created by the Russians called Agisoft invented for scanning sculptures in day light outdoors.

We wait 2 wks and will receive our scanned file links.  If we like it we could order statuettes of our body scan, a small one 7cm, or under 10cm, cost around 10 to 15euros, blank or colored.

I looked at the statuettes, great impressive details!
I remember in 2009, such a statuette would have costed 100$, and the details are no where this good.

3d scanning has come a long way.
I am glad that I came to visit the BodyCapture stand.

Mr. Luc Benhaim's website: ViveDemain, check out his gallery, you will more examples of whats possible.  Objects, furniture, different figurines. The scanning itself only took a few minutes.

Stay tuned, more later.


Luc Benhaim BodyScan expert ; Mr. Losit Photogrammetry expert                            


sg going home w xyzQin, scanned.
Will wait and see the results.  :)
Stay tuned.

------------
more:


Other Body Scanning in virtual world 2010 /Face mapping in physical world Linz 2011/:

>avatar whittling dolls by Wotthedickens , vr scanning, takes 15mn?
at that time a reproduced printed doll cost 100us for color print, I think 8" high?  Cant remember the size.  But not a tiny figurine.
http://swannbb.blogspot.fr/2010/05/wotthe-dickens.html


>Wotthe Dickins made a software, he scanns the body of the avatar, and outcomes a miniature doll replica of the Avatar! Very expressive little dolls. :)


>Original Av and doll made by Wotthedickens in sl


>Original Av and doll - The AV is "rough" as it is wearing a graphics skin from 2007, the current skins are much more slick.  The doll is a scanned version of the rough skin, therefore, whittling effects.  But I think v interesting.


>Av doll

The Doll sculptie is very interesting because its scooped out in ways thats determined by a logarithym, almost metallic as the cut outs are always in straight lines, so we are facing a form thats like a rough cut rock. Very sculptural and efficient in lines and shapes with color textures directly from the original


>Painterly and sculptural forms - shows the efficient strokes of the texture and the "cutting" unlike the original AV which is smoothly powdered like cotton swabbed.
>current 3d printer small 7cm figurine (2017), 10-15eur bw/color; .stl file = 8us$

-----------------------------

"Face Mapping" at Linz 2011, (Artist name here)


>Installation of a Swiss Artist (name and ref here) at Ars Electronica 2011, stitching topographic maps, high definition scans of faces of sitters takes 30mn.  Close up of eye


>Installation of a Swiss Artist (name and ref here) at Ars Electronica 2011, stitching topographic maps, high definition scans of faces of sitters takes 30mn

> result is a flattened strangely non focus but expressive face w great great details. Like a landscape you could scrawl on.


Autodesk exhibition 
(at Bastille 2014?) with a large installation of body scanning booth (Russian company name here):
(photo and name here)

I had tried the scanning, a room size fulling lit multiple flash while person standing on  turning device.  Some colors are not recommended during the scan - as it disappears and needs repairs.  

Definition is ok, persons face are distorted.  Sample figurines are shown.  Price was ?  


Thursday, 30 March 2017

“The Turin Horse” : Bela Tarr

http://www.indiewire.com/2016/12/bela-tarr-interview-marrakech-film-school-1201762173/

He got his start with activist documentaries, the kinds built of shaky cameras and fiery politics, a far departure from the controlled fatalism that would define his later work. But as Tarr tells it, the move from social realism to metaphysical poetics was entirely natural. “When you finish a movie, you have a new question. And for the new question, you cannot use the old answer and that’s how, step by step, you grow up and develop a style or language.” Step by step, question by answer, he moved towards a greater level of narrative abstraction; he moved up the art-house ranks; he moved 2011, towards “The Turin Horse.”

I must find his movie and watch it, stay tuned!

12 easy Yoga Poses

http://www.stylecraze.com/articles/basic-yoga-asanas-for-beginners/
yoga

12 Easy Yoga Poses For Beginners

  1. Tadasana
  2. Uttanasana
  3. Virabhadrasana I
  4. Adho Mukha Svanasana
  5. Vrikshasana
  6. Bhujangasana
  7. Marjariasana
  8. Balasana
  9. Setu Bandhasana
  10. Baddha Konasana
  11. Supta Matsyendrasana
  12. Shavasana

1. Tadasana


Tadasana - Easy Yoga Poses For Beginners

Image: iStock
Also Known As – Mountain Pose
Benefits – The Tadasana is the mother of all the asanas. Most standing asanas spring from the Tadasana. The very first thing this asana will do is correct your posture. It will strengthen your legs and tone your hips and stomach. It increases the agility of your spine. When you take the right stance, everything else falls in place.
How To Do It – Stand erect, and place your feet slightly apart. Let your hands hang from your shoulders, alongside your body. Firm the muscles in the thighs, but make sure you do not harden the lower part of the abdomen. Strengthen the inner arches of the ankles, and feel the energy pass from your feet to your head. Turn your gaze upwards, and breathe. Feel the stretch in your body as you hold the pose for a few seconds. Release.
To know more about this asana, click here: Tadasana

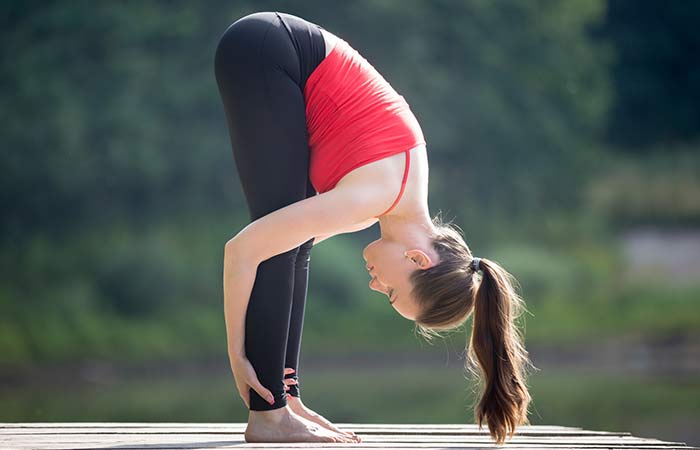
2. Uttanasana


 Uttanasana - Yoga Poses For Beginners

Image: iStock
Also Known As – Padahastasana, Hasta Padasana, Standing Forward Bend
Benefits – Uttanasana, when translated in English, is called the most powerful stretch. This asana improves blood circulation and allows a fresh bath of blood that is filled with nutrients and oxygen to rush to your head. When this happens, you feel instantly rejuvenated. This asana stimulates the kidneys, liver, and digestive system. It also gives your back a good stretch. It calms your mind and relieves headaches and insomnia.
How To Do It – Stand in the Tadasana, and take a long deep breath. Bend as you exhale. Fold your body at the waist. Place your hands on the floor beside your feet that are parallel to each other. Push your torso forward as you extend the stretch and lift the tailbone. Hold for a few seconds and release.
To know more about this asana, click here: Uttanasana

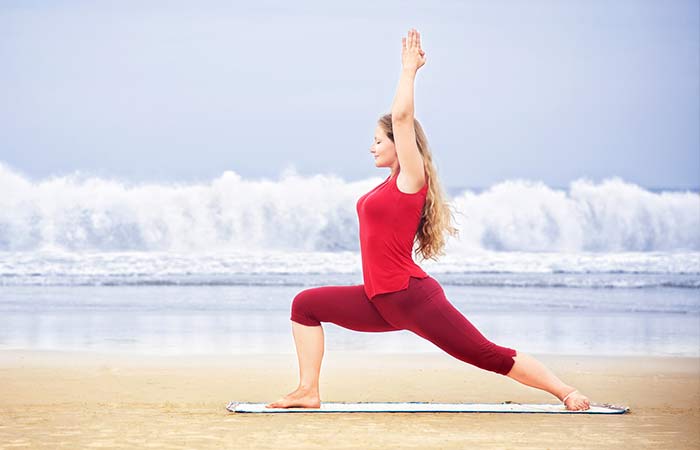
3. Virabhadrasana I


 Virabhadrasana-I - Yoga Poses For Beginners

Image: iStock
Also Known As – Warrior Pose
Benefits – This asana allows you to explore your upper body. It helps open up your chest. It also works intensely on your back and legs, thereby stretching and strengthening them. It is an excellent asana for those who have desk jobs because not only does it restore the health of the spine, but it also stimulates the metabolism. It relaxes the mind and body and also helps you focus.
How To Do It – Place your feet hip-width apart. Now, pivot on your left foot, and allow your right foot to face forward. Ensure that the arch of the left foot is in the same line as the right foot. Lower the pelvis as you assume a lunge. Lift your arms above your head and look forward. You could pulse and then hold the pose. Maintain your balance and integrity while you hold this graceful pose. Release and repeat with the left foot forward.
To know more about this asana, click here: Virabhadrasana I

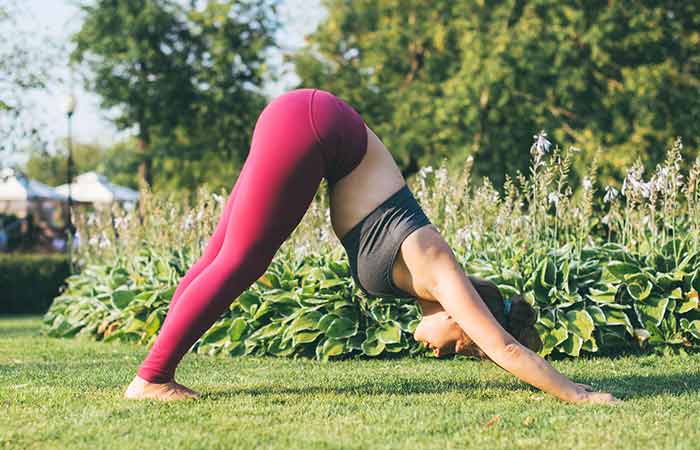
4. Adho Mukha Svanasana


Adho Mukha Svanasana - Yoga Poses For Beginners

Image: iStock
Also Known As – Downward Facing Dog
Benefits – At the outset, this asana is great for your spine. It elongates the spine and removes all the stress and tension that is trapped in the spine. It also gives the hamstrings a good stretch and helps strengthen the legs. This eliminates a whole lot of burden from the back. Blood circulation is improved, and so is digestion. You are left energized and rejuvenated after this asana.
How To Do It – Come onto your fours. Now, lift your knees off the floor, and straighten them. Place your feet flat on the ground. This might be challenging for a beginner. No matter how your feet are placed, ensure that you are comfortable and not in pain. Take two steps backward and move your hands forward so as to create an inverted ‘V’ with your body. Your hips should be higher than your heart, and your head lower. Let your head hang as you hold the pose for a few seconds. Release.
To know more about this asana, click here: Adho Mukha Svanasana

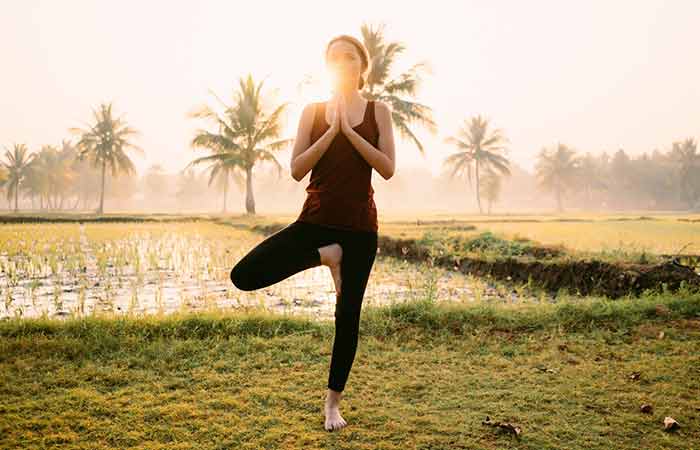
5. Vrikshasana


Vrikshasana - Yoga Poses For Beginners

Image: iStock
Also Known As – Tree Pose
Benefits – The Vrikshasana is a great balancing pose. It helps you improve your ability to focus and concentrate. This asana strengthens the spine and the legs. It also aids neuromuscular coordination. Through this asana, you can improve your seeing and hearing abilities. It helps deepen the thorax too.
How To Do It – Stand in the Tadasana. Slowly lift your right foot off the floor, and hug your right knee. Once you gain some balance, open up your right hip by turning your folded knee out. Place your right foot against the left thigh and hold the pose. As a beginner, you can use the wall for support. Eventually, you can fold your hands at the center of your chest. Also, remember to set your gaze on a distant object to help you focus and balance better. Once you release, repeat the asana with your left foot raised.
To know more about this asana, click here: Vrikshasana

6. Bhujangasana

1. Tadasana


Tadasana - Easy Yoga Poses For Beginners

Image: iStock
Also Known As – Mountain Pose
Benefits – The Tadasana is the mother of all the asanas. Most standing asanas spring from the Tadasana. The very first thing this asana will do is correct your posture. It will strengthen your legs and tone your hips and stomach. It increases the agility of your spine. When you take the right stance, everything else falls in place.
How To Do It – Stand erect, and place your feet slightly apart. Let your hands hang from your shoulders, alongside your body. Firm the muscles in the thighs, but make sure you do not harden the lower part of the abdomen. Strengthen the inner arches of the ankles, and feel the energy pass from your feet to your head. Turn your gaze upwards, and breathe. Feel the stretch in your body as you hold the pose for a few seconds. Release.
To know more about this asana, click here: Tadasana

2. Uttanasana


 Uttanasana - Yoga Poses For Beginners

Image: iStock
Also Known As – Padahastasana, Hasta Padasana, Standing Forward Bend
Benefits – Uttanasana, when translated in English, is called the most powerful stretch. This asana improves blood circulation and allows a fresh bath of blood that is filled with nutrients and oxygen to rush to your head. When this happens, you feel instantly rejuvenated. This asana stimulates the kidneys, liver, and digestive system. It also gives your back a good stretch. It calms your mind and relieves headaches and insomnia.
How To Do It – Stand in the Tadasana, and take a long deep breath. Bend as you exhale. Fold your body at the waist. Place your hands on the floor beside your feet that are parallel to each other. Push your torso forward as you extend the stretch and lift the tailbone. Hold for a few seconds and release.
To know more about this asana, click here: Uttanasana

3. Virabhadrasana I


 Virabhadrasana-I - Yoga Poses For Beginners

Image: iStock
Also Known As – Warrior Pose
Benefits – This asana allows you to explore your upper body. It helps open up your chest. It also works intensely on your back and legs, thereby stretching and strengthening them. It is an excellent asana for those who have desk jobs because not only does it restore the health of the spine, but it also stimulates the metabolism. It relaxes the mind and body and also helps you focus.
How To Do It – Place your feet hip-width apart. Now, pivot on your left foot, and allow your right foot to face forward. Ensure that the arch of the left foot is in the same line as the right foot. Lower the pelvis as you assume a lunge. Lift your arms above your head and look forward. You could pulse and then hold the pose. Maintain your balance and integrity while you hold this graceful pose. Release and repeat with the left foot forward.
To know more about this asana, click here: Virabhadrasana I

4. Adho Mukha Svanasana


Adho Mukha Svanasana - Yoga Poses For Beginners

Image: iStock
Also Known As – Downward Facing Dog
Benefits – At the outset, this asana is great for your spine. It elongates the spine and removes all the stress and tension that is trapped in the spine. It also gives the hamstrings a good stretch and helps strengthen the legs. This eliminates a whole lot of burden from the back. Blood circulation is improved, and so is digestion. You are left energized and rejuvenated after this asana.
How To Do It – Come onto your fours. Now, lift your knees off the floor, and straighten them. Place your feet flat on the ground. This might be challenging for a beginner. No matter how your feet are placed, ensure that you are comfortable and not in pain. Take two steps backward and move your hands forward so as to create an inverted ‘V’ with your body. Your hips should be higher than your heart, and your head lower. Let your head hang as you hold the pose for a few seconds. Release.
To know more about this asana, click here: Adho Mukha Svanasana

5. Vrikshasana


Vrikshasana - Yoga Poses For Beginners

Image: iStock
Also Known As – Tree Pose
Benefits – The Vrikshasana is a great balancing pose. It helps you improve your ability to focus and concentrate. This asana strengthens the spine and the legs. It also aids neuromuscular coordination. Through this asana, you can improve your seeing and hearing abilities. It helps deepen the thorax too.
How To Do It – Stand in the Tadasana. Slowly lift your right foot off the floor, and hug your right knee. Once you gain some balance, open up your right hip by turning your folded knee out. Place your right foot against the left thigh and hold the pose. As a beginner, you can use the wall for support. Eventually, you can fold your hands at the center of your chest. Also, remember to set your gaze on a distant object to help you focus and balance better. Once you release, repeat the asana with your left foot raised.
To know more about this asana, click here: Vrikshasana

6. Bhujangasana
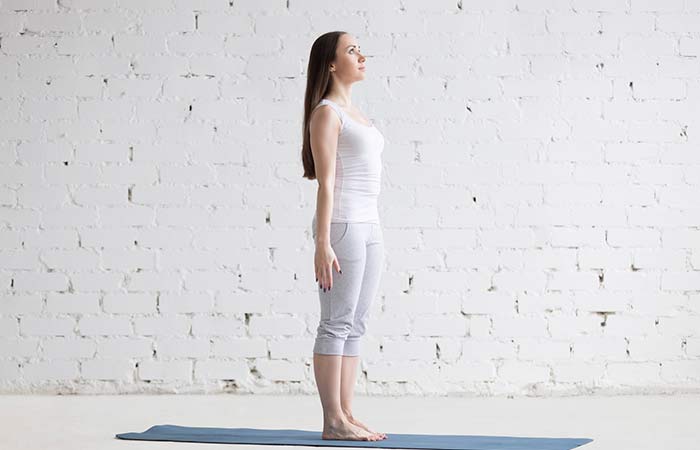
1. Tadasana


Tadasana - Easy Yoga Poses For Beginners

Image: iStock
Also Known As – Mountain Pose
Benefits – The Tadasana is the mother of all the asanas. Most standing asanas spring from the Tadasana. The very first thing this asana will do is correct your posture. It will strengthen your legs and tone your hips and stomach. It increases the agility of your spine. When you take the right stance, everything else falls in place.
How To Do It – Stand erect, and place your feet slightly apart. Let your hands hang from your shoulders, alongside your body. Firm the muscles in the thighs, but make sure you do not harden the lower part of the abdomen. Strengthen the inner arches of the ankles, and feel the energy pass from your feet to your head. Turn your gaze upwards, and breathe. Feel the stretch in your body as you hold the pose for a few seconds. Release.
To know more about this asana, click here: Tadasana

2. Uttanasana


 Uttanasana - Yoga Poses For Beginners

Image: iStock
Also Known As – Padahastasana, Hasta Padasana, Standing Forward Bend
Benefits – Uttanasana, when translated in English, is called the most powerful stretch. This asana improves blood circulation and allows a fresh bath of blood that is filled with nutrients and oxygen to rush to your head. When this happens, you feel instantly rejuvenated. This asana stimulates the kidneys, liver, and digestive system. It also gives your back a good stretch. It calms your mind and relieves headaches and insomnia.
How To Do It – Stand in the Tadasana, and take a long deep breath. Bend as you exhale. Fold your body at the waist. Place your hands on the floor beside your feet that are parallel to each other. Push your torso forward as you extend the stretch and lift the tailbone. Hold for a few seconds and release.
To know more about this asana, click here: Uttanasana

3. Virabhadrasana I


 Virabhadrasana-I - Yoga Poses For Beginners

Image: iStock
Also Known As – Warrior Pose
Benefits – This asana allows you to explore your upper body. It helps open up your chest. It also works intensely on your back and legs, thereby stretching and strengthening them. It is an excellent asana for those who have desk jobs because not only does it restore the health of the spine, but it also stimulates the metabolism. It relaxes the mind and body and also helps you focus.
How To Do It – Place your feet hip-width apart. Now, pivot on your left foot, and allow your right foot to face forward. Ensure that the arch of the left foot is in the same line as the right foot. Lower the pelvis as you assume a lunge. Lift your arms above your head and look forward. You could pulse and then hold the pose. Maintain your balance and integrity while you hold this graceful pose. Release and repeat with the left foot forward.
To know more about this asana, click here: Virabhadrasana I

4. Adho Mukha Svanasana


Adho Mukha Svanasana - Yoga Poses For Beginners

Image: iStock
Also Known As – Downward Facing Dog
Benefits – At the outset, this asana is great for your spine. It elongates the spine and removes all the stress and tension that is trapped in the spine. It also gives the hamstrings a good stretch and helps strengthen the legs. This eliminates a whole lot of burden from the back. Blood circulation is improved, and so is digestion. You are left energized and rejuvenated after this asana.
How To Do It – Come onto your fours. Now, lift your knees off the floor, and straighten them. Place your feet flat on the ground. This might be challenging for a beginner. No matter how your feet are placed, ensure that you are comfortable and not in pain. Take two steps backward and move your hands forward so as to create an inverted ‘V’ with your body. Your hips should be higher than your heart, and your head lower. Let your head hang as you hold the pose for a few seconds. Release.
To know more about this asana, click here: Adho Mukha Svanasana

5. Vrikshasana


Vrikshasana - Yoga Poses For Beginners

Image: iStock
Also Known As – Tree Pose
Benefits – The Vrikshasana is a great balancing pose. It helps you improve your ability to focus and concentrate. This asana strengthens the spine and the legs. It also aids neuromuscular coordination. Through this asana, you can improve your seeing and hearing abilities. It helps deepen the thorax too.
How To Do It – Stand in the Tadasana. Slowly lift your right foot off the floor, and hug your right knee. Once you gain some balance, open up your right hip by turning your folded knee out. Place your right foot against the left thigh and hold the pose. As a beginner, you can use the wall for support. Eventually, you can fold your hands at the center of your chest. Also, remember to set your gaze on a distant object to help you focus and balance better. Once you release, repeat the asana with your left foot raised.
To know more about this asana, click here: Vrikshasana

6. Bhujangasana